Step 1: Set Up Users
Make sure the people who will run the ACA forms and reports have access to the routines, reports, and forms for ACA reporting. To print the ACA forms and create the ACA electronic file, Connect will use information from the Human Resources and Payroll Government Reporting applications. You’ll want to set up the user rights for the user who is completing the ACA checklist with access to Human Resources, Timekeeping, and Payroll Government Reporting.
Verify user security settings in Payroll Government Reporting
Your ACA specialist will need access to these sections in the Government Reporting module: Organization, ACA Corrections (if applicable), and 1094/1095s (printing the forms).
Do this...
1. Open Connect System Management > Security > Setup/Modify User Rights.
2. Use the User box to enter the user name. Press Enter.
3. Find the section titled Rights.
4. Find the row titled Payroll and then click the [+] to expand the Payroll section.
5. Find the row titled Government Reporting and click [+] to expand the Government Reporting section.
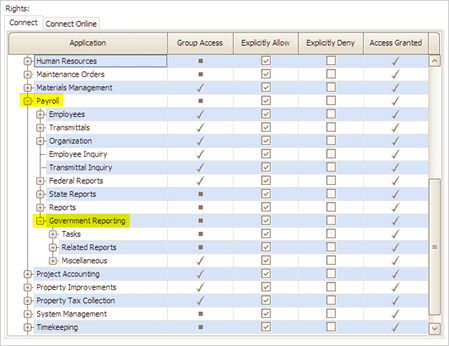
Navigating to the Government Reporting section
6. Set up the rights to access ACA tasks.
- Find the row titled Tasks and click [+].
- Find the row titled ACA Employees.
- Click to select the checkbox in the column titled Explicitly Allow.
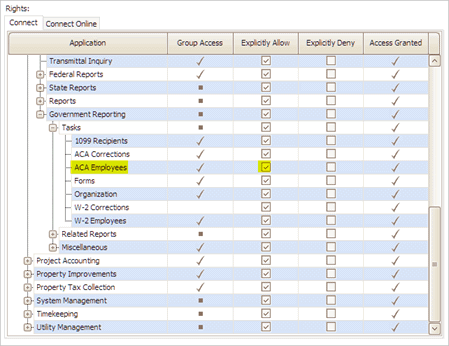
Explicitly allow user access to ACA Employees
7. Set up the rights to access ACA routines.
- Find the row titled Miscellaneous and click [+].
- Find the row titled Create ACA File.
- Click to select the checkbox in the column titled Explicitly Allow.
- Repeat these steps to grant the user explicit access to Checkout ACA Employees and Convert Year-end ACA Information.
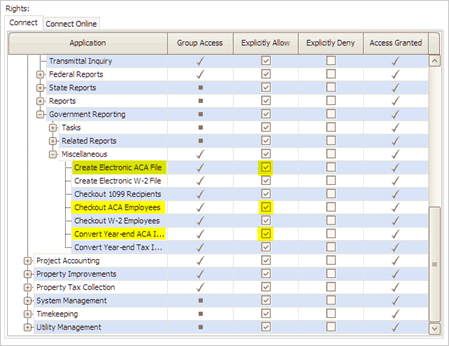
Explicitly allow user access to ACA tasks
When you’re done, the user will have explicit access in the Government Reporting application to:
- ACA Employees
- Create Electronic ACA File
- Checkout ACA Employees
- Convert Year-end ACA Information
- Organization
- ACA Corrections (if applicable)
- 1094/1095s
Verify user security settings in Timekeeping
Your ACA specialist will need access to the Timekeeping Organization table to set the period dates for ACA reporting.
Do this...
1. Open Connect System Management > Security > Setup/Modify User Rights.
2. Use the User box to enter the user name. Press Enter.
3. Find the section titled Rights.
4. Find the row titled Timekeeping and then click the [+].
5. Find the row titled Organization and then click [+].
6. Find the row titled Task and then click [+].
7. Find the row titled Organization.
8. Click to select the checkbox in the column titled Explicitly Allow.
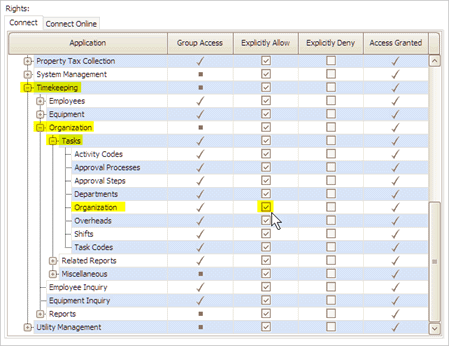
Explicitly allow user access to Organization in Timekeeping
When you’re done, the user will have explicit access to the:
- Organization table in Timekeeping to set the period dates
Verify user security settings in Human Resources
Your ACA specialist will need access to these tables and tasks in the Human Resources application: Setup New Employees (for setting up employee benefits), Modify Existing Employees, Benefits, Organization, and Benefit Enrollment Report.
Do this...
1. Open Connect System Management > Security > Setup/Modify User Rights.
2. Use the User box to enter the user name. Press Enter.
3. Find the section titled Rights.
4. Find the row titled Human Resources and then click the [+].
5. Set up the access to the employees.
- Find the row titled Employees and click [+].
- Find the row titled Tasks and click [+].
- Find the row titled Modify Existing Employees.
- Click to select the checkbox to the column titled Explicitly Allow.
- Repeat these steps to grant the user explicit access to Setup New Employees.

Explicitly allow user access to Setup/Modify Employees in Human Resources
6. Set up the access to the Organization table.
- Find the row titled Organization and click [+].
- Find the row titled Tasks and click [+].
- Find the row titled Organization.
- Click to select the checkbox titled Explicitly Allow.
- Repeat these steps to grant the user explicit access to Benefits.
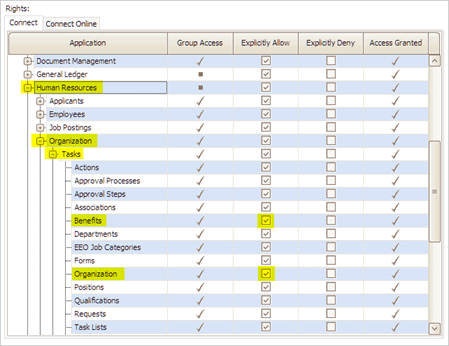
Explicitly allow user access to Benefits and Organization in Human Resources
When you’re done, the user will have explicit access to the Organization table and Benefits table in the Human Resources application.
Related Articles
ACA FAQs
Videos What about my employees who did not accept health insurance coverage? ACA is a reporting of health insurance that was offered to the employee. It does not report if the employee accepted the health insurance offer. So, ACA reporting tells the ...How do I add an ACA correction?
Use a correction file when the transmission status is accepted with errors. Use the Acknowledgement File to enter corrections in the employee information and employer information and then submit the correction file to the IRS. Important! None of the ...Step 4: Set Up ACA Annual Reporting
You're done setting up the ACA options in Timekeeping, Human Resources, and Payroll. Now you’re ready to import the employee’s ACA information into the Government Reporting module, verify the employee’s ACA information is correct, and print Forms ...Step 2: Set Up Timekeeping
If this is your first time using Connect to generate ACA forms and electronic file, you will need to set up the ACA options for the Timekeeping application. Connect uses the Timekeeping application to determine if an employee is a full-time ...Step 3: Set Up Human Resources
Set up the ACA Reporting tools in the Human Resources application. ACA Reporting uses the information from Human Resources to show an employee’s benefits and record when an employee was offered coverage. A. Set up contact information IRS requests the ...